How to solder a connector: A step-by-step guide
Soldering is a fundamental skill in electronics and engineering, and knowing how to solder a connector can come in handy for various applications. Whether you’re repairing electronics, building custom cables, or working on hobby projects, soldering connectors allows you to create reliable electrical connections. But first, what is a connector? In this context, it is a device used to join electrical circuits together, serving as a bridge between two or more electrical conductors, allowing for the transmission of electrical signals, power, or data between them. They can come in a variety of forms all designed to meet specific requirements.
Health & Safety- Ask igus®

To make this process run smoothly, you must know what you’re doing when you’re soldering so this guide is not for beginners and is more so to broaden your understanding! At igus®, on top of our extensive product range, we have a team of highly skilled employees that have the training to solder your connectors for you, saving you a considerable amount of time and effort and most importantly removing the risk of soldering them yourself.
If this is something you would be interested in, our experts would be happy to answer your questions and provide more information targeted towards your specific needs here.
To discover more about igus® connectors click here.
Gather your materials and begin!
- Before you begin soldering, make sure you have all the necessary materials and tools to complete the task and safety equipment: A soldering iron, wire, heat shrink tubing or electrical tape (for insulation), wire strippers and the connector with wires to be soldered. Start by preparing the wires that will be soldered to the connector, using wire strippers to remove a small section of insulation from the end of each wire, exposing the bare metal underneath. Be careful not to strip away too much insulation! Make sure that the terminals are clean and free from any debris or oxidation.
- Tinning the wires: Apply a small amount of solder to the exposed metal strands (necessary to improve conductivity and make it easier to solder the wires to the connector later) Hold the soldering iron against the wire and touch the solder to the wire until it flows and coats the strands evenly. Be careful not to apply too much solder.
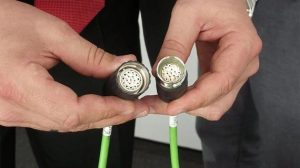
- Carefully insert each tinned wire into its respective terminal on the connector. Make sure the wires are positioned securely and that there is good contact between the wire and the terminal.
- Heat the terminal with the soldering iron and apply solder to the joint where the wire and terminal meet. The solder should melt and flow smoothly, creating a strong bond between the wire and the connector.
- Once all connections have been soldered, insulate them to prevent short circuits or accidental contact. If you’re using heat shrink tubing, slide it over each connection and use a heat gun to shrink it into place.
Once satisfied with the connections, secure the connector in its intended location. If it has screw terminals, tighten them to hold the wires in place. If necessary, use cable ties or adhesive to secure the wires and prevent strain on the connections.
So, why solder a connector?
It provides a reliable and long-lasting solution for joining wires and terminals in electrical systems. While it requires skill and precision, the benefits of soldering often outweigh the initial effort, resulting in higher performance, improved reliability, and enhanced longevity of the connections.